Pages

Saturday, September 29, 2012

Ice Cream #7: Raspberry Sorbet


Sorbet really honors the undiluted flavor of whichever fruit you're using and raspberry sorbet happens to be one of my favorites. It feels elegant to eat even though it's quite simple. It's simple to make too, using only five ingredients: water, sugar, vanilla, lemon juice, and raspberries. This sorbet is intensely flavorful and a beautiful color to boot! Many sorbets run the risk of being too icy, but this one has a nice smooth consistency.


I actually made the base for the sorbet months ago to take advantage of the perfectly ripe berries while in season. I froze the base and just recently let it defrost in the fridge and processed it in the ice cream maker. Of course, you can make this sorbet anytime of the year using frozen raspberries. 


We had Aaron's sister, Amy, over a couple weeks ago for a going away dinner, as she'll be out of town for the next few months. For dessert, I served this raspberry sorbet with a slice of rustic peach tart (it's a good thing I grabbed the last of the peaches while I did, as the following week they were gone from the farmer's market and won't be back until next season- oh woe is me). Of course, the sorbet is perfectly amazing all on its own as a light and refreshing palate cleanser at the end of a big meal. However, paired with the peach tart, it was a wonderful way to celebrate the end of summer. 


RASPBERRY SORBET

Ingredients:
2 cups water
1½ cups sugar
1 tsp. vanilla extract
1¼ lb. (20 oz.) fresh or frozen (defrosted) raspberries (about 5 cups) 
2 tbsp. fresh lemon juice

In a 2 quart saucepan, bring the water and sugar to a boil, stirring to dissolve sugar. Reduce heat to low and simmer, without stirring, to create a light syrup, about 5 minutes. Remove from heat and set aside to cool for 15 to 20 minutes.  

Meanwhile, puree the raspberries in a blender or food processor until smooth. Scrape the puree through a fine mesh sieve into a medium size bowl. Discard seeds. Stir the lemon juice and vanilla extract into the raspberry puree. Add the sugar syrup to the puree and stir well to combine. Cover bowl with plastic wrap and refrigerate until cold, preferably overnight. 

Pour sorbet into an ice cream maker and freeze according to the manufacturer’s instructions. Transfer the sorbet to a plastic container and place in the freezer until completely set, about 1 hour. 

Makes about 5 cups

Thursday, September 27, 2012

Chocolate Zucchini Bundt Cake


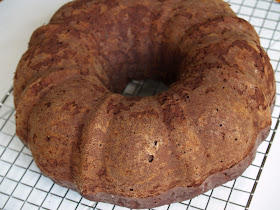
With zucchini in abundance, either at the farmer's market or, if you're lucky enough, in your own home garden, this cake is a great way to use up all those zukes! I came across this recipe while flipping through Andrea Chesman's, Garden-Fresh Vegetable Cookbook. It's definitely a keeper. I was very pleased with this recipe, as the cake turned out extremely moist with a rich and deep, decadent chocolate flavor. If I didn't tell you there was zucchini in it, you probably wouldn't know. It's main purpose is to provide lots of moisture and give a great texture to the overall cake.


I love bundt cakes because they're simple, yet elegant. The pan does all the work for you, creating those classic decorative ridges. You don't even have to frost the cake or drizzle it with icing, simply dust with confectioner's sugar and voila! It's extra yummy with a scoop of vanilla ice cream on the side too. 


Typically, I make bundt cakes in the fall and winter months as I try to avoid using the oven in the summer as much as possible. But I often feel like I'm neglecting my bundt cake pan as it hangs on the wall for an entire season collecting dust (I suppose it's strange to be guilted by piece of baking equipment). So this is a great recipe to have on hand as it can only be made while zucchinis are in season, forcing me to get some use out of the pan in summer and early fall. Yum!


CHOCOLATE ZUCCHINI BUNDT CAKE

Recipe from Andrea Chesman, The Garden-Fresh Vegetable Cookbook

Ingredients:
2¼ cups unbleached all-purpose flour
¾ cup unsweetened cocoa powder
2 tsp. baking powder
1 tsp. baking soda
1 tsp. salt
½ tsp. ground cinnamon
2 cups lightly packed brown sugar (dark or light)
½ cup unsalted butter, at room temperature
2 large eggs, at room temperature
3 oz. bittersweet baking chocolate, meted and cooled (see notes below)
1 tsp. pure vanilla extract
½ cup coffee
3 cups grated zucchini or summer squash (about 2 to 3 medium zucchini or squash)
Confectioner's sugar, for dusting

Preheat oven to 350 degrees F. Grease a 10-inch bundt pan with butter and lightly flour. Tap the pan to remove any excess flour. Set aside.

Place a fine-mesh sieve over a medium size bowl and sift together the flour, cocoa powder, baking powder, baking soda, salt, and cinnamon.

In a large mixing bowl, cream together the brown sugar and butter, until light and fluffy, about 3 minutes. Add the eggs, one at a time, beating well after each addition. Beat in the melted chocolate and vanilla. Add the flour mixture in thirds, alternating with the coffee, and beat until smooth. Fold in the zucchini and scrape the batter into the prepared bundt pan. 

Bake for 50 minutes, or until a toothpick or skewer inserted into the cake comes out clean. Cool the cake in the pan for 10 minutes, then invert onto a wire rack, remove the pan, and allow to cool completely. Dust with confectioner's sugar just before serving (if you dust it too far in advance, the cake will absorb the sugar and you'll have to dust it again).

Yield: 12 to 16 servings

Notes:
  • To melt the chocolate: chop the chocolate into small pieces and place it in a 2-quart saucepan or medium size glass heat-proof bowl. Temper the chocolate by placing the pot inside or the bowl over a larger 4-quart saucepan of just simmering water. Keep the water at a simmer (do not let boil) and stir the chocolate with a rubber spatula until it is completely smooth and melted. Remove chocolate from simmering water and allow to cool to room temperature before proceeding with the recipe. 
  • If you forget to take your eggs out of the refrigerator to come to room temperature prior to making the cake, simply place them in a bowl of warm (not hot) water for 10 to 15 minutes. 

Tuesday, September 25, 2012

Sweet Garlic Dill Pickles

I've been making these pickles for a number of years now. I get so excited to see the mountain of Kirby cucumbers stacked high at the farmer's market. What's more, they usually sell for a bargain! You can use regular cucumbers, of course, but I like these as they are short, squaty, and fit perfectly in a pint jar. Apparently, Kirbies are "burp-free," or so they're advertised at the farmer's stand. Who knew?


Sweet garlic dills are not as sweet as bread and butter or sweet pickles. I know everyone is partial to one kind of pickle or another, but I find these are pretty well liked across the board. The great thing about this recipe is that it doesn't require an overnight soak, making  these pickles extremely quick to prepare. Simply bring the pickling liquid to a boil, pour over the cut cucumbers, and process for 10 minutes. It's as easy as that. In fact, if you're new to canning, this is a great beginner recipe as you can't really mess it up.


These sweet garlic dills always have a nice crunch. I find that letting them sit in their jar for about a month before opening allows their flavor to fully develop. A great snack on their own, or an accompaniment to a delicious sandwich. Sometimes I even put a jar of pickles out at parties, as it makes for fun informal eating. After all, who can resist a homemade pickle? 


SWEET GARLIC DILL PICKLES
Slightly adapted from Ellie Topp & Margaret Howard, The Complete Book of Small-Batch Preserving

Ingredients:
10 to 12 (about 3 lb.) small pickling cucumbers (such as Kirby)
4 large cloves garlic, peeled
4 heads fresh dill or 4 tsp. dill seeds
1/2 tsp celery seeds
2 cups white vinegar (5% acidity) 
1 cup water
1/2 cup granulated sugar
2 tbsp. pickling salt (see notes below)
1/8 tsp. turmeric
4 pint mason jars, cleaned and sterilized

Cut the ends off each cucumber, or enough so that they'll fit nicely in the jars. Cut the cucumbers lengthwise into quarters.

Place 1 clove garlic, 1 head fresh dill (or 1 tsp. dill seeds), and 1/8 tsp. celery seeds into each of the 4 jars. Tightly pack the cucumbers into the jars and set aside. 

Combine the vinegar, water, sugar, salt, and turmeric in a small saucepan and bring to a boil. Pour the boiling vinegar mixture over the cucumbers in each jar, leaving 1/2-inch of headspace (if any of the cucumber slices begin to float to the surface, add another cucumber to the jar so that they are very snug and will not float). Process for 10 minutes in a boiling water bath canner (for more detailed information, see my step-by-step guide to canning here).

Yield: 4 pint jars 

Notes:

  • Most grocery stores don't carry pickling salt, so look for it at specialty food stores or online. Pickling salt differs from other table salts in that it is free of additives that darken the pickles or turn the pickling liquid cloudy (such as iodine and anti-caking agents). In a jiffy, you can substitute pickling salt with kosher salt, but since the size of kosher salt is slightly larger than pickling salt, the measurements will differ when measured by volume. So if using kosher salt for this recipe, use 2 heaping tbsp. of kosher salt in place of 2 regular tbsp. of pickling salt.

Thursday, September 20, 2012

Celebrating 1 Year!

This month marks the first anniversary of Persimmon & Peach! It's been such a blast to jump into this blogging world full throttle. Over the past year, I've really tried to branch out and push myself to become a better cook and in the process share my recipes and findings with you. Thanks to all my friends and readers who've been so supportive and kind. To celebrate, I thought I'd share some of my favorite photos from the past twelve months. A BIG thank you to everyone who's followed along! 


Monday, September 17, 2012

Thomas Keller's Ratatouille


Thomas Keller, famed chef and owner of The French Laundry, Per Se, Ad Hock, and Bouchon, was the food consultant for Pixar to help create the signature dish for their 2007 film, Ratatouille. Keller's upscale layered variation of ratatouille (actually called confit byaldi) they used for the film has been floating around cyber space for ages, but I've just now gotten around to cooking it. Aaron and I are huge Pixar fans and have seen almost every one of their films in theaters (often on opening night). I even dressed as WALL-E for Halloween a few years ago- so fun! 


After Ratatouille first came out I searched for the recipe, but to no avail. It wasn't until a couple years ago that I thought to look for it again, and low and behold, it was all over the internet. As you can imagine I was very pleased.


Anytime we bring up Ratatouille (the movie or the dish), Aaron and I can't help quoting the film. We particularly love it when the terrifying food critic, Anton Ego, is asked what he would like for dinner and exclaims: "Surprise me!" I find myself saying, "surprise me," in Anton's deep, menacing voice even to questions that don't warrant that response (I just like the way it sounds). *SPOILER ALERT* In the end, Remy the rat does in fact surprise Anton with the humble yet elegant peasant dish you see before you, flooding Anton's thoughts with fond childhood memories of his mother cooking ratatouille at home. I nearly cry every time! Every time.


Ratatouille is such a simple yet delicious Provencal dish. It celebrates summer's bounty by using tomatoes, peppers, eggplant, zucchini, and summer squash- so much veg! Slicing the vegetables paper thin elevates the ratatouille to a more sophisticated level, while cooking it in a cast iron skillet still gives it that rustic feel. Yes, slicing the vegetables takes some time, but relax, have a glass of wine, listen to some music, and enjoy the meditative process (if you have a mandoline, use it for the squash!). It's definitely worth the wait and so much fun to eat!

We loved this dish so much, I've made it several times in the past month. After a trip to the Santa Cruz farmer's market while visiting family in California a couple weeks ago, I made this dish for my brother and sister-in-law. I cooked the tomato and pepper base, arranged the sliced veggies, and refrigerated it for them to enjoy a lovely "no cook" home cooked meal in the days after we left. With my ADORABLE little niece running around leaving them little time to cook, all they had to do was pop it in the oven and dinner was served. In fact, if you're making this dish for company, you can prepare it a day in advance as I did for my brother. When ready to bake, simply heat the dish up on the stovetop over medium heat until warm and place it in the oven. Served with a lovely green salad and couscous or quinoa, this ratatouille can easily serve four. As vegetables are the star of this dish, and there's no butter in the recipe, this is a perfect option for a vegetarian or vegan dinner. 


RATATOUILLE (CONFIT BYALDI)
Slightly adapted from Thomas Keller

Ingredients:
½ red pepper, seeds and ribs removed
½ yellow pepper, seeds and ribs removed
½ orange pepper, seeds and ribs removed
5 tbsp. olive oil, divided
1½ tsp. minced garlic (or more to taste), divided
½ yellow onion, finely diced (about ½ cup)
1 28-oz. can San Marzano whole peeled tomatoes, seeded and chopped, juices reserved (or 3 to 4 tomatoes, peeled, seeded and chopped, juices reserved)
2 sprigs fresh thyme (plus 1 extra sprig for sprinkling) 
1 sprig Italian parsley
1 small bay leaf
1 zucchini (about 7 to 8 oz.), sliced in 1/16-inch rounds
1 Japanese eggplant (7 to 8 oz), sliced in 1/16-inch rounds
1 yellow summer squash (7 to 8 oz.), sliced into 1/16-inch rounds
4 to 5 Roma tomatoes, sliced into 1/16-inch rounds
1 to 2 tsp. aged balsamic vinegar
Salt and freshly ground black pepper to taste

Preheat the oven to 450 degrees F. Place the peppers cut-side down on a foil-lined baking sheet. Roast until their skins loosen and begin to brown slightly, about 15 to 20 minutes. Remove from oven and let rest until cool enough to handle. Peel and chop finely. 

Combine 2 tbsp. olive oil, 1 tsp. garlic, and the onion in an 8-inch cast iron skillet (or other ovenproof skillet), over low heat until very soft but not browned, about 8 minutes. Add the chopped tomatoes, their juices, 2 sprigs thyme, parsley, and bay leaf. Simmer over medium-low heat until very little liquid remains, about 10 to 15 minutes. Be careful not to brown.

Add the peppers and simmer for a couple of minutes to soften them. Season to taste with salt and discard herbs. Reserve 1 to 2 tbsp. of the mixture for the vinaigrette, leaving the rest in the bottom of the pan. Remove from heat.

Reduce the oven temperature to 275 degrees F. Starting from the outer edge of the pan and working your way in, arrange alternating slices of zucchini, eggplant, yellow squash, and Roma tomatoes. Allow the slices to overlap so that about ¼-inch of each slice is exposed. Repeat until the pan is filled.

Sprinkle the pan with the remaining garlic and the leaves from the remaining sprig of thyme. Drizzle with 2 tbsp. olive oil and season with salt and pepper.

Cover the pan with foil and seal well. Bake until the vegetables are tender, about 2 hours. Uncover and bake for 30 minutes more. If the pan has accumulated any excess liquid after baking, carefully drain it off. 

To make the vinaigrette, combine the reserved tomato and pepper mixture with the remaining 1 tbsp. olive oil, balsamic vinegar, and salt and pepper to taste. Drizzle around plate and serve hot. 

Yield: 2 to 4 servings

Notes:
  • Look for vegetables that are similar in size, which makes arranging them in the pan easier and more uniform.
  • Feel free to puree the tomato and pepper mixture with the balsamic in a blender to create a smoother vinaigrette. You can also omit the vinaigrette altogether and simply drizzle each plate or serving with a few drops of balsamic.
  • When serving, use a cake spatula for ease in lifting the veggies out of the pan and plating.
  • If you have any leftover veggie slices that didn't fit in the pan, use them in a frittata or vegetable stir-fry. 


Thursday, September 13, 2012

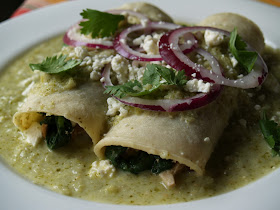
Chicken, Spinach, & Mushroom Verde Enchiladas


This is a fairly quick recipe for veggie and chicken filled enchiladas. It's even faster if you have leftover chicken from the previous night's dinner. I find that's always a great excuse to make this dish. Tomatillos are such a delicious summer treat. When I saw these at the farmer's market the other day, I got really excited, as did my dog Lady (only she didn't know why). It was food of one kind or another, so that was good enough for her!


When searching for tomatillos, look for ones that are small to medium in size and bright green. The bigger the tomatillo, the more diluted its flavor will be, so try to find smaller ones which tend to pack more punch. Look for tomatillos with their papery husks intact. When storing, be sure the husks are thoroughly dry otherwise they can spoil more quickly.  Tomatillos will keep well in the refrigerator for a month or more. 


The verde sauce for this recipe doesn't take long at all. You throw all of the ingredients in a blender or food processor, cook it down while you saute your vegetables, and voila! It's so great to have on hand, I like to freeze any leftover sauce to throw together a quick weeknight meal. As for the filling, feel free to use all kinds of veggies as it's pretty open to interpretation. These enchiladas are great for the summer because they're light, but still filling. 


CHICKEN, SPINACH, & MUSHROOM VERDE ENCHILADAS
Slightly adapted from Rick Bayless, Mexican Everyday 

Ingredients:

For the verde sauce:
3 cloves garlic
1 to 2 jalapeno or serrano chiles, stemmed and quartered 
1 medium sized yellow onion, roughly chopped
1½ lb. (about 12 to 15 medium) tomatillos, husked, rinsed, and quartered
¾ cup (loosely packed) roughly chopped cilantro, plus a few extra sprigs for garnish
3 tbsp. vegetable oil, olive oil, or bacon drippings, plus some for the tortillas 
2 cups chicken or vegetable stock
3 tbsp. Mexican crema, sour cream, heavy cream, or creme fraiche 
½ tsp. sugar (optional)

For the filling:
8 oz. mushrooms (such as button, oyster, or shiitake), stemmed and sliced
1 large red onion, thinly sliced (reserve a few slices for garnish)
10 oz. (about 10 cups) spinach
1 to 2 cups shredded cooked chicken (omit for vegetarian enchiladas) 
Salt and pepper to taste
12 corn tortillas, preferably store bought
1 cup (4 oz.) crumbled Mexican queso fresco, or other fresh cheese such as feta or goat cheese

Preheat the oven to 350 degrees F. With a food processor or blender running, add the garlic and chiles one at a time, allowing each piece to be finely chopped before adding the next. Add the onion, tomatillos, and cilantro, and process until smooth.

In a medium (3 to 4 quart) saucepan, heat 1½ tbsp. of the oil or bacon drippings over medium-high heat. Add the tomatillo puree and cook, stirring nearly constantly, until the mixture has thickened and reduced (to the consistency of a thick tomato sauce), about 7 minutes. (The longer you cook down the sauce, the sweeter and richer it will become). Add the chicken or vegetable stock and simmer the sauce over medium heat for about 10 to 15 minutes. 

Meanwhile, heat the remaining 1½ tbsp. of oil or bacon drippings in a large 12-inch skillet over medium-high. Add the mushrooms and cook for a few minutes, stirring almost constantly, until they begin to brown. Add the onion and continue cooking, stirring every so often, until the onion is translucent. Add the spinach and chicken, stirring constantly, until the spinach has wilted and the chicken is heated through. Season to taste with salt and pepper, set aside and cover to keep warm.

Lay the tortillas on a sheet pan and brush both sides of the tortillas with oil or bacon drippings. Stack them in twos on the pan and bake just until they are soft and pliable, about 3 minutes. Remove from the oven and stack in a single pile. Cover with foil or a clean kitchen towel to keep warm.

Stir the crema or cream into the verde sauce. Season to taste with salt (about 1 tsp.) and add the ½ tsp. sugar if the sauce tastes a bit tart. Holding a tortilla by one edge, dip it into the sauce and place it on a plate. Spoon a generous amount of spinach and chicken filling down the middle of the tortilla. Sprinkle with cheese and roll up the tortilla, seam-side down on the plate. Repeat until all of the tortillas are filled. Generously spoon the verde sauce over the enchiladas. Garnish with a sprinkling of cheese, cilantro, and sliced onions. 

Yield: 4 to 5 servings