Wednesday, March 28, 2012

Corned Beef & Cabbage


Though corned beef and cabbage has become synonymous with Ireland and St. Patrick's Day, there are many discrepancies over the origins of the dish and its roots in native Irish cuisine. The practice of curing meats was a necessity in old world Europe as a means to safely preserve meats. In Ireland, beef would have been considered an expensive luxury item, but for Irish immigrants in the U.S., corned beef was cheap. It is thought that Irish immigrants living in New York City bought corned beef from Jewish butchers and adapted it to their cuisine. Today, it is by far the meal of choice eaten by Irish American families (or those wishing to be Irish for a day) in the U.S. on St. Patrick's Day.


I remember many a St. Patrick's Day my dad would take my family out to get corned beef and cabbage (in retrospect, I think he was the only one who ate it). I was too little to understand what it was and thought it was something old people ate. Little did I know how good it could be! Of course, corning it yourself is incomparable to the pre-corned beef you can buy at the store. After all, half the fun comes from corning it yourself. Aaron and I had friends over the other night to celebrate a very belated St. Patrick's Day. Guinness, Irish whiskey, and car-bombs abound! The corned beef and cabbage wasn't too bad either.


CORNED BEEF & CABBAGE
Adapted from Joy of Cooking & an Alton Brown recipe

Ingredients:
4-5 lbs. brined corned beef brisket (see recipe here)
1 tbsp. whole black peppercorns
1 tsp. ground allspice
2 tsp. kosher salt
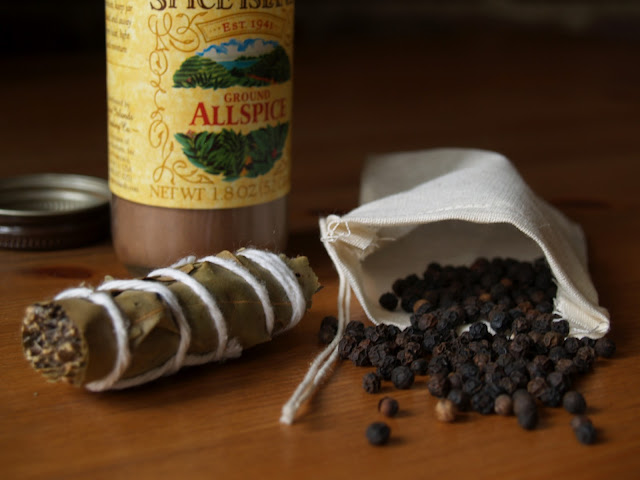
2 bay leaves or 1 bouquet garni 
1 head green cabbage, chopped into 1-inch pieces (remove heart prior to chopping)
2 bunches of carrots, cut into ½-inch slices (about 1 lb.) 
2 yellow onions, roughly chopped 
Spice bag or cheesecloth

Thoroughly rinse the brisket in cold water to remove the brine. Place the brisket in a large stockpot or Dutch oven and pour in enough water to cover the brisket by 1 inch (about 3 quarts). Place the peppercorns and bay leaves (or bouquet garni) in a small spice bag and add to the pot along with the allspice and salt. Bring to a boil and then reduce heat to a simmer and cover pot.  Cook for approximately 45 minutes per pound, about 3 to 4 hours or until a fork can easily penetrate to the center of the brisket.  

20 minutes prior to the brisket being done, add the carrots and onions to the pot and cover again.  After 10 minutes, add the cabbage and let cook for another 10 to 15 minutes.  Remove the brisket and cover loosely with foil. Drain the carrots, onions, and cabbage through a colander, discarding cooking liquid. Discard the spice bag and transfer the vegetables to a medium sized bowl and cover with foil to keep warm. Allow the meat to rest for 10 to 15 minutes prior to cutting. Slice the meat against the grain into thin slices. Arrange the corned beef and vegetables on a platter. Serve with boiled potatoes.       

Notes:
  • Feel free to add potatoes to the pot with the carrots and onions. 
  • By cooking the vegetables in the brisket liquid, they will absorb its incredibly flavorful broth. You can serve the corned beef with the vegetables and broth as a stew, or drain and separate them as I've done above. If making a stew, remove the brisket and chop it into 1-inch pieces and return it to the pot prior to serving.


Sunday, March 25, 2012

Mastering Mother Sauces & Classic Hollandaise


As Julia Child states in Mastering the Art of French Cooking, "Sauces are the splendor and glory of French cooking." For those who don't know, mother sauces are the principle sauces used in French cuisine by which innumerable other sauces (secondary sauces) derive. The five mother sauces are as follows: hollandaise, bechamel, veloute, espagnole and tomate. In the 19th century, chef Marie-Antoine Careme created hundreds of French sauces, and later, chef Auguste Escoffier consolidated and updated these sauces into the five mother sauces we know today. These main branches of sauces can be manipulated into entirely new sauces by adding eggs, cheese, wine, stock etc. 


Over the last couple of weeks, I've set out to put these sauces to memory.  It's important for every cook to have these in their repertoire, and being the nerd that I am, I wanted to practice. To get back to basics and make sure I was on the right track, I turned to that classic and thoroughly comprehensive tome, Mastering the Art of French Cooking, for guidance. Beginning to know these sauces like the back of my hand has given me freedom and confidence in the kitchen. It's wonderful to be able turn a simple piece of chicken or fish, for example, into something really elegant and exciting to eat with one of these sauces. 


For Americans, the most common of these sauces (aside from tomato) is Hollandaise, so that's where I've begun. In short, Hollandaise sauce is an emulsion of egg yolks and butter with a dash of lemon juice or vinegar. The most important thing to remember when making Hollandaise is to whisk the eggs over low heat, otherwise they'll scramble or become slightly grainy. Also, it's critical to allow each addition of butter to incorporate fully before adding more, as the yolks can only absorb so much butter at one time. I've provided both recipes for Hollandaise from Mastering, one for making it by hand and the other for making it in a blender. The blender version is incredibly fast and a perfect no fuss method (a great solution for a brunch party, where you don't want to be stuck in the kitchen whisking). Julia doesn't include cayenne pepper in her recipe but I like the addition of some heat. As everyone knows, the classic accompaniments include eggs benedict and asparagus, but don't forget about poultry and fish as well. 


HOLLANDAISE SAUCE
Barely adapted from Mastering the Art of French Cooking, Child, Bertholle, Beck

Ingredients:
6 to 8 oz. unsalted butter, cut into tablespoons (3/4 to 1 cup or 1½ to 2 sticks)
3 egg yolks
1 tbsp. cold water
1 to 2 tbsp. lemon juice
Heavy pinch of salt
2 tbsp. cold unsalted butter, divided
Pinch of cayenne (optional)
Salt and pepper to taste

In a small saucepan, melt the butter over medium heat and set aside (I find it helpful to transfer the butter to a plastic squeeze bottle for ease in incorporating later).

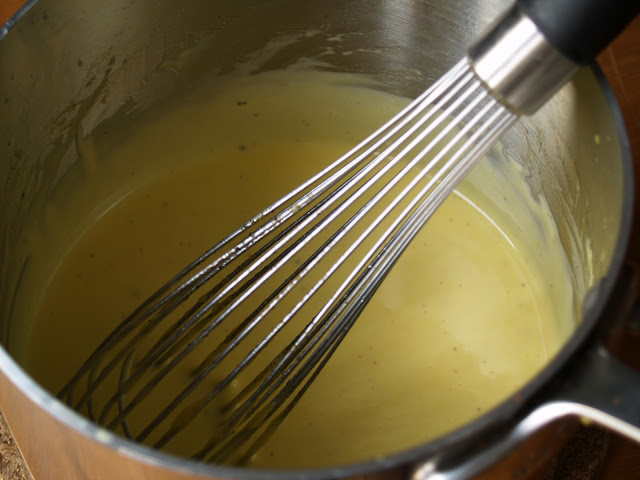
Place the egg yolks in a 4 to 6 cup enameled or stainless steel saucepan, and using a whisk, beat until the eggs become thick and sticky, about a minute. Add the water, pinch of salt, and lemon juice (start with 1 tbsp. and add more to taste later) and beat a few seconds more to incorporate. 

Add 1 tbsp. of cold butter to the eggs and place the pan over very low heat or a pot of barely simmering water. Using the whisk, stir the eggs until they begin to thicken into a smooth creamy consistency, about 1 to 2 minutes (if the eggs look as if they're thickening too quickly, or appear as if they're forming small lumps, immediately remove the pan from heat and place in a bowl of cold water. Then return to the heat and continue beating). The eggs have reached the proper consistency when you can see the bottom of the pan between strokes. It should be light and creamy in texture. Remove the pan from heat and whisk in the other tablespoon of cold butter (this will help the yolks to stop cooking). 

Off the heat, beat the yolks and begin to pour in the melted butter a little at a time (about a quarter-teaspoon) until the sauce begins to thicken into a heavy creamy consistency. Then begin to pour in the butter more rapidly. Omit any milk solids on the bottom of the butter pan (or squeeze bottle). Season the sauce to taste with salt, pepper, lemon juice and cayenne. Serve immediately, or set the pan in a warm place. It will keep well for an hour on the stove near other hot cooking pans, or in a pan of warm water. I've even placed the sauce in a thermos, which works well too (it just creates more cleanup). 

Yield: 1 to 1½ cups hollandaise (serving 4 to 6 people)

Notes:
  • If the sauce becomes too thick, beat in 1 to 2 tbsp. of hot water, milk, or stock to thin it out.  
  • If the sauce does not thicken properly, place 1 tbsp. of sauce and 1 tbsp. of lemon juice in a medium-sized mixing bowl and beat to combine. Then, beat in the rest of the sauce a half tablespoon at a time, beating well after each addition before adding more (this method works incredibly well, even for sauce that separates after defrosting).
  • If the finished sauce curdles or begins to separate, beat in a tablespoon of cold water, otherwise use the tip above.
  • Leftover hollandaise will keep well in the fridge for 1 to 2 days, or can be frozen. When ready to use, beat two tablespoons of sauce over low heat or hot water. Slowly beat in the rest of the sauce by teaspoonfuls, until the sauce is well incorporated and heated through. 
  • Leftover hollandaise can also be used as an enrichment for sauces such as bechamel and veloute. Gradually beat the hollandaise a tablespoon at a time into either sauce while still hot, off the heat and just prior to serving. 


BLENDER HOLLANDAISE

Ingredients:
3 egg yolks 
¼ tsp. salt
Pinch of freshly ground black pepper
Pinch of cayenne (optional)
1 to 2 tbsp. lemon juice
4 oz. or 1 stick of unsalted butter, cut into pieces

Melt the butter in a small saucepan over medium heat until foaming, remove from heat. Transfer butter to a plastic squeeze bottle or small bowl (preferably spouted for ease in pouring). 

Place the egg yolks, salt, pepper, cayenne, and lemon juice in a blender, cover and blend on high for 2 to 3 seconds. Remove the center part of the blender lid, and with the blender on high speed, slowly pour in the melted butter in a thin, steady stream (omit the milky residue on the bottom of the bowl or bottle). Once the butter has been incorporated, turn off blender and taste to adjust seasonings. Serve immediately.

Yield: 1 cup (serving 4 people)

Notes:
  • If not using the sauce immediately, transfer to a bowl placed in tepid, but not warm water.
  • If the sauce becomes too thick, add a bit more lemon juice or water and blend it again for 1 or 2 seconds at high speed to incorporate. 


Wednesday, March 21, 2012

Sous Chef Lady


When in the kitchen, our dog Lady goes by the name Sous Chef. Her desperate eyes are always looking up at me begging to help cook. I must say, she's a very eager student. As soon as she hears the sound of chopping, she enthusiastically races into the kitchen to see what she can do. I've even see her wake from a particularly engaging dream and jump to her feet as if it were nothing. For Lady, food always comes first.

Lady is also a wonderful cleaner. She seems to actually enjoy picking up loose scraps off the floor and has no complaints keeping it tidy and generally spotless. However, there are times when she appears almost too eager. For instance, she dearly loves a chicken and has a tendency to jump about my feet in the hopes that she might help me truss it. I always remind her that patience is a virtue, especially in the kitchen.  

Even when Lady is not all that interested in what I'm cooking, she still prefers to stay at my side, albeit lying on the floor. God forbid she miss something important! A snooze here and there seems to help this little sous chef save her energy for more cleaning and the occasional taste testing. This I would have to say, is her one flaw. She always seems to enjoy whatever I give her. I often advise her to really taste what she's eating. Does it need more salt? Too sweet? No matter what, her answer is always the same, "I LOVE IT!" Occasionally, she's speechless. While flattering, this can be a challenge when developing and testing recipes. However, her other qualities outshine this one fault, so I have no choice but to let it slide. Thanks Lady, for all your diligence and hard work in the kitchen. Without you, cooking just wouldn't be the same. 

Saturday, March 17, 2012

Bailey's Ice Cream


Top o' the Mornin' to you! Sorry, I couldn't resist. This recipe comes from Nigella Lawson and it's a perfect dessert for a home cooked St. Patrick's Day dinner. I've been making this yummy ice cream in honor of this beloved Irish holiday for the last few years and every time I serve it, it's always a hit. It has now become a tradition Aaron and I look forward to all year long. 


This ice cream is unbelievably soft and creamy with the satisfying richness of Bailey's Irish Cream. You'll be tempted to add more Bailey's, but a little goes a long way. I like to cut the creaminess with a butter wafer drizzled or dipped in chocolate. The best part is, you're left with the rest of the bottle of Bailey's when you're done! That is never a bad thing. Happy St. Patty's Day!


BAILEY'S ICE CREAM
Adapted from a Nigella Lawson recipe

Ingredients:
2 1/3 cups whole milk
1¾ cups heavy cream
½ cup Bailey’s Irish Cream
1 whole vanilla bean
3 large eggs
4 large egg yolks
1 cup sugar
2 tsp. pure vanilla extract
1 tsp. sea salt

Combine the milk and cream in a medium saucepan. Split the vanilla bean in half lengthwise and using a small knife, scrape out the seeds. Stir the seeds and bean pod into the milk and cream mixture. Bring to a slow boil over medium heat, then reduce to low and simmer for 10 minutes, stirring occasionally.

Combine eggs, egg yolks, sugar, and salt in a medium sized bowl. Use a hand mixer on medium speed to beat until the mixture is thick, smooth, and pale yellow in color (similar in texture and color to homemade mayonnaise), about 2 minutes.

Remove the vanilla bean pod from the cream mixture and discard. Measure out 1½ cups of the hot cream mixture. With the mixer on low speed, add the hot cream mixture to the egg mixture in a slow steady stream. Once thoroughly combined, pour the egg mixture back into the saucepan with the rest of the hot cream mixture and stir well to combine. Cook, stirring constantly, over medium-low heat until the mixture is thick enough to coat the back of a spoon. Pour the mixture into a large metal bowl through a sieve, stir in Bailey’s and vanilla. Place the metal bowl containing the custard inside a larger bowl filled with 2-inches of ice water. Stir the custard until it is cool. Cover with a piece of plastic wrap placed directly on the custard. Place in the refrigerator until completely chilled, about 2 hours or overnight. 

Process the custard according to the ice cream machine manufacturer’s directions. The ice cream will have a lovely soft and creamy texture. Transfer the ice cream to quart containers and place in freezer (because of the alcohol in the Bailey's, the ice cream will take about 10 hours or so to freeze). 

Yield: 1½ quarts

Friday, March 16, 2012

Homemade Spicy Guinness Mustard


I've never made homemade mustard before, but I wanted to create something special to accompany my corned beef brisket in the coming weeks. I was going to do a more traditional mustard until I came upon this recipe from Saveur. What could be better than the combination of beer and mustard? Guinness mustard is the perfect condiment to accompany my upcoming St. Patty's Day feast.


Making homemade mustard probably sounds like a lot of work. The good news is, it's not! Simply throw all of the ingredients in a bowl, let it sit out for a day or two, and then toss in a food processor and pulse until you reach the desired consistency. It's that easy. The best part is, it lasts in the refrigerator for up to 6 months. That means many months of delicious sandwiches. Since this recipe produces a good amount of mustard, you'll have enough leftover to give away as gifts. I can't wait to surprise our dinner guests with this spicy unexpected homemade treat.


SPICY GUINNESS MUSTARD:
Slightly tweaked from Saveur, Issue 117

Ingredients:
1 12-oz. bottle Guinness Extra Stout 
1¾ cups brown mustard seeds (see notes below)
1 cup red wine vinegar
1 tbsp. kosher salt
1 tsp. freshly ground black pepper (I used ½ tsp. pepper because I included yellow mustard seeds in my batch, which are plenty hot)
1/4 tsp. ground cinnamon
1/4 tsp. ground cloves
1/4 tsp. ground nutmeg
1/4 tsp. ground allspice

Combine all of the ingredients in a medium sized non-reactive bowl. Cover with a sheet of plastic wrap and let sit at room temperature for 1 to 2 days to allow the mustard seeds to soften and the flavors to meld.

Transfer the mixture the bowl of a food processor and process, stopping every so often to scrap down the sides of the bowl with a rubber spatula (process until the seeds are coarsely ground and the mustard begins to thicken, about 2 to 3 minutes). Transfer the mustard to several glass jars with tight fitting lids. Refrigerate overnight to use immediately, or refrigerate up to 6 months. 

Yield: 4 1/2 cups

Notes:
  • I used a combination of brown, black, and yellow mustard seeds. Yellow mustard seeds are hot and peppery, while the brown and black are a bit more mild. There is little different in taste between brown and black mustard seeds, so use whatever you can find. These are generally cheaper if you buy them in larger packages at specialty spice stores, such as Kalustyan's in NYC (123 Lexington Ave.).
  • As expected, the potency of the mustard will mellow a bit as it ages.

Thursday, March 15, 2012

Corning Beef Brisket


There's nothing corny at all about corned beef brisket. The term "corning," refers to the size of the salt in which the brisket is cured. In Old English, the word "corn" was used to describe any small particle or grain. As it is no longer necessary to cure meats as a form of preservation, today, we still enjoy this salty, flavorful beef because we love the taste. I've bought the pre-corned beef before (which in my opinion is cheating), but the flavor is incomparable to corning it yourself. The recipe below gets the seasonings just right and is incredibly easy to prepare. After all, half the fun comes from corning it yourself! I'll be making this brisket in honor of St. Patrick's Day (albeit a week later), so I'll post the finished product and a little history of the dish in the days to come.


If you've ever wondered why cooked corned beef is traditionally a light rosy pink color, it's because it has nitrates added to the brine. Generally speaking, I try to buy meats and sausages that are nitrate free, as studies have suggested nitrates cause cancer. Yikes! Why would I want to cook with something that could potentially cause cancer you ask? Well, it's not like I go around eating it at every meal, so having it every now and again or on special occasions isn't going to do much harm.


Back in the day, before modern refrigeration, saltpeter (potassium nitrate) was an essential ingredient used in the meat curing process, which prevented the growth of bacteria that cause botulism. Today, you won't be able to walk into any grocery store and find saltpeter. This is due to the fact that potassium nitrate, aside from curing meat, is commonly used in pyrotechnics and rocket ignition compounds (I bet you want to get it now, just to feel like a badass). You can order food grade potassium nitrate online through The Science Company and it usually ships the next business day. The use of saltpeter to keep the meat pink is entirely optional, so if buying it online sounds too complicated or you're opposed to adding nitrates to your food, leave it out! I've made it without saltpeter and it was still incredibly delicious, just brown in color instead of pink. Another option, is to substitute the saltpeter for Morton's Tender Quick (a mixture of salt, sugar, sodium nitrate, sodium nitrite, and propylene glycol). You can sometimes find it at well stocked grocery stores or online.


CORNED BEEF BRISKET

Recipe courtesy Alton Brown

Ingredients:
2 quarts water
1 cup kosher salt
½ cup brown sugar (light or dark)

2 tbsp. saltpeter, crushed to a powder (optional)
1 cinnamon stick, broken up
1 tsp. mustard seeds
1 tsp. black peppercorns
8 whole cloves
8 whole allspice berries
12 whole juniper berries
2 bay leaves, crumbled
½ tsp. ground ginger
2 lbs. ice (about 2 ½ trays of ice)
1 (4 to 5 lb.) beef brisket, trimmed
2 2-gallon-sized zip top bags

Place the water into a large 6 to 8 quart stockpot along with salt, sugar, saltpeter, cinnamon stick, mustard seeds, peppercorns, cloves, allspice, juniper berries, bay leaves, and ginger.  Cook over high heat until the salt and sugar have dissolved.  Remove from the heat and add the ice.  Stir until the ice has melted. Place the brine in the refrigerator until it reaches a temperature of 45 degrees F on an instant-read thermometer. 

Once it has cooled, place the brisket into a 2-gallon sized zip top bag and add the brine.  Seal and place inside another 2-gallon bag and seal again (I do this incase the first bag leaks, the second one will catch the brine). Lay the bagged brisket flat inside a baking dish or sheet pan, and place in the refrigerator for 10 days (or up to 3 weeks).  Check daily to make sure the beef is completely submerged and stir the brine.  After 10 days, remove the brine and rinse the brisket well under cool water before cooking.    

Monday, March 12, 2012

Saint Patrick's Day Garland


A couple of years ago I started a tradition of cooking a big Irish feast in honor of St. Patrick's Day. Feeling festive, I decided to make a garland bursting with green and clovers to aid in the celebration of the day. I have always been drawn to old post cards. I love their vibrant colors, old world images, and humorous anecdotes. It's also fun to read the backs of many of these cards, which are commonly written in the impeccable swirling penmanship of days gone by.


I thought it would be fun to feature these vintage postcards as garland. A bit of green ribbon and a glue stick and I had it made! As I didn't have enough postcards to fill an entire length of ribbon, I did a google search and came up with more than enough images to create my garland. With the help of our hearty Irish dinner and festive St. Patrick's Day garland, we'll be transported to the lush green grasses of Ireland, if only for a night. I just hope I'm not too hung over to remember it the next day.


Here's how to make it:
  • Collect enough postcards (or do a google image search and print them out) to run the desired length of your garland.
  • If you printed the images out from your computer, cut poster board out into rectangular squares to fit the sizes of your postcards. Glue the postcards to the poster board rectangles using a glue stick.
  • Punch small holes in the upper left and right corners of the postcards using a small hole-punch or pin. 
  • Cut a length of green ribbon to attach your postcards to.
  • Cut small lengths of slightly thinner green ribbon and run them through the small holes. Attach the thin ribbons to the long one, tying them into small bows.

Saturday, March 10, 2012

Classic Manhattan


Some things never go out of style. There's a reason the classic Manhattan cocktail is still around today, because it tastes damn good. I love how sophisticated and full of flavor a simple drink made up of only three ingredients (whisky, sweet vermouth, and bitters) can be. Though simply constructed, drinking a Manhattan never fails to take my taste buds on a journey as complex and diverse as the city it's named for. To me, it tastes "old", like it's had a hundred years to settle and age in the depths of the glass, until you take one sip and suddenly wake it up. Intrigued by this alluring cocktail, I decided to find out how it began and when. After all, every good cocktail tells a story.


I found quite a bit of information on the drink, referencing old cocktail books such as, The Savoy Cocktail Book, but also the first edition of Edible Manhattan, which devoted an entire article to the history and lore of this popular drink. Just recently, The Wall Street Journal featured an article on the Manhattan, including some inspiring new variations. 


As you might expect for such an old famous drink, its origins remain elusive. The only thing that's certain is that it was extremely popular at American bars in the late 1800s. Before long, the drink spread to Europe and became popular in bars such as the Savoy in London, and the New York Bar in Paris. To quote Edible Manhattan directly, "To many foreign visitors during that era, American cocktails represented everything that fascinated them about American urban society during the Gilded Age: ingenuity, creativity, self-indulgent excess and a swaggering disregard for convention." Thankfully, due to the Manhattan's appeal overseas, the drink was not forgotten during Prohibition, and waited patiently across the Atlantic until 1933 when Prohibition ended. By then, the martini had taken the lead as America's favorite cocktail and its popularity still endures to this day. While trends go in and out of style, for me, the Manhattan will always remain the quintessential cocktail. 


MANHATTAN COCKTAIL

Ingredients:
2 oz. rye (traditionally used) or bourbon whiskey (see notes below)
1 oz. sweet Italian vermouth
2 dashes bitters (or more to taste)
A stemmed maraschino cherry (optional) 

Combine the whiskey, vermouth, and bitters in a mixing glass. Add 2 to 3 ice cubes and quickly stir the ingredients, until well chilled. Strain into a 4 oz. stemmed cocktail glass. Toss in the cherry.

Notes:
  • I usually use 3 oz. whiskey, even though the traditional recipe calls for 2 oz. Taste them both and see what you prefer. I've also been known to use just a splash of sweet vermouth to coat the glass before adding the chilled whiskey and bitters depending on my mood.
  • This cocktail will taste dramatically different depending on which ingredients you use, so experiment will various bitters, whiskeys, and vermouth. I prefer The Bitter Truth brand of bitters because of the nuances of clove. I also find myself using Bulleit Bourbon or Templeton Rye (Prohibition era whisky), for the thrill of defiance. There are many vermouths and obviously whiskeys on the market, so experiment to find a combination that works for you.


Wednesday, March 7, 2012

Pecan Pralines


I'd never had a praline until visiting New Orleans. A) Where have I been? B) Why has no one told me about them? They are heavenly! I'd heard of French pralines before, but the American version has evolved into something entirely different. They are delicate and buttery sugar-based candies loaded with pecans, with a consistency somewhat similar to fudge. Being the Yankee that I am, when I walked up to the counter to order this newly discovered confection, I made the mistake of calling them"pray-leans." I was quickly corrected and informed that in New Orleans they are called "praw-leans." Duly noted.


These little guys melt in your mouth and are full of mouthwatering flavor. One of our favorite places we tried pralines was at Pralines by Jean, an entire shop specializing in these famous southern style candies. As Aaron and I explored New Orleans on foot, we devoured a couple of bags. We tried rationing them, but we soon gave in to temptation. Lucky for us, there were more to be found on every corner!


Once we returned to New York, we quickly went through withdrawals. As there aren't many places to find New Orleans style pralines in NYC, I thought I'd make them myself.  As it turns out, they're quite simple, the only tricky part is knowing when they're done. A candy thermometer alleviates this concern, as you remove the sugary concoction from the heat at precisely 240 degrees F (the soft-ball stage). These were just as magical as the ones we tasted in NOLA. What could be better than warm pralines made right in your own home?


PECAN PRALINES
Courtesy: Paul Prudhomme, Chef Paul Prudhomme's Louisiana Kitchen

Ingredients:
3/8 lb. (1½ sticks) unsalted butter
1 cup sugar
1 cup packed light brown sugar
½ cup heavy cream
1 cup whole milk
1 cup chopped pecans
2 cups pecan halves
2 tbsp. vanilla extract

Since you will have to work quickly while making your pralines and won't be able to walk away from the pot, be sure all of your ingredients are prepped and your utensils are close at hand.

Line two sheet pans with parchment and set aside. In a large heavy-bottomed pot, melt the butter over high heat. Once it has completely melted, add the sugars and heavy cream, whisking constantly, about 1 minute. Add the milk and chopped pecans, whisking for 4 minutes more. Reduce heat to medium and whisk continuously for another 5 minutes. Add the pecan halves and vanilla, and continue whisking until the mixture reaches 240 degrees F on a candy thermometer (soft-ball stage), about 10 to 15 minutes. The mixture should form a neat thread over the surface when drizzled with a spoon.

Remove the pot from heat. Working as quickly as possible, carefully drop the batter by heaping spoonfuls (an ice cream scoop works best) onto the prepared sheet pans. Each mound should form into about a 2-inch patty. Let cool completely and serve immediately, or wrap each praline in plastic wrap or foil and store in a well-sealed container.

Notes:
  • If you're not using a candy thermometer (although I highly suggest that you do) you'll know the batter is done when it begins to form threads on the sides and bottom of the pot. Remove a bit of batter to test that it is done before taking it off the heat. 
  • If the mixture starts to smoke at any point during cooking, lower the heat.
  • Once you've reached the end of transferring the batter to the sheet pans, you may be left with a few pralines that do not look as glossy as the rest. This is the result of the batter cooling. It won't affect the taste at all, just the texture.
  • For quick and easy cleanup: place all your utensils in the pot and fill with water. Either let them rest until the batter has dissolved, or bring to a boil over high heat.