Monday, October 29, 2012

Homemade Graham Crackers


This is part II to my previous post on marshmallows. After all, how can you make marshmallows with the sole intention of using them for s'mores, and not make graham crackers to go along with them? You can't. I researched a lot of graham cracker recipes before I landed on the one you see before you. It comes from Nancy Silverton's cookbook, Pastries from the La Brea Bakery. It's been floating around the internet for awhile now, and is considered by many to be the quintessential recipe for graham crackers. I know I'm not contributing anything new here, but I thought I'd share the recipe none the less. 


Traditionally, graham crackers are made with graham flour (a type of whole wheat flour), originally developed in the 19th century by a Presbyterian minister by the name of Sylvester Graham. Graham initially developed his cracker as a health food and were a staple in his Graham diet. Though graham flour can be found at health food stores and specialty food stores, realistically, not many of us keep it on hand. The recipe below uses regular unbleached all-purpose flour or a combination of pastry flour and whole wheat flour. I'm sure Sylvester is rolling in his grave and would probably consider the recipe below as sacrilege, but it's certainly more convenient and can be made on a whim from ingredients already in your home. 


As I've mentioned in previous posts, Aaron and I just got back from the Adirondacks. Each night after dinner (and happily tired from hiking or rowing around in a boat near Lake George), we'd build a campfire and enjoy our scrumptious s'mores outside our cozy cabin. These cracker's taste just like the store-bought varieties, only better! I love their imperfect, homemade charm. Crisp and flavorful and the perfect vessel for gooey marshmallows and melted chocolate. A great idea for your upcoming Halloween party that's sure to leave both kids and adults begging for more! 


HOMEMADE GRAHAM CRACKERS
Recipe from Nancy Silverton, Pastries from the La Brea Bakery

Ingredients:
2½ cups plus 2 tbsp. (375 grams) unbleached all-purpose flour (or substitute ½ cup whole wheat flour or 1 cup whole wheat pastry flour with part of the all-purpose flour)
1 cup (176 grams) dark brown sugar, lightly packed
1 tsp. (6 grams) baking soda
¾ tsp. (4 grams) kosher salt
7 tbsp. (100 grams) unsalted butter, cut into 1/2-inch cubes and frozen
1/3 cup (114 grams) honey
5 tbsp. (77 grams) whole milk
2 tbsp. (27 grams) pure vanilla extract

To make the dough: Combine the flour, brown sugar, baking soda, and salt in the bowl of a food processor fitted with a steel blade (or in the bowl of an electric mixer fitted with the paddle attachment). Pulse several times (or mix on low speed) to incorporate. Add the frozen butter and pulse several times (or mix on low speed) until the mixture is the consistency of course meal (you can also mix the ingredients by hand using a pastry blender). 

In a small bowl, whisk together the honey, milk, and vanilla extract. Add to the flour mixture and pulse on and off several times (or mix on low) until the dough just comes together and clears the sides of the bowl. It will have a soft and slightly sticky consistency. Turn out the dough onto a large sheet of plastic wrap lightly dusted with flour. Pat the dough into a rectangle about 1-inch think. Wrap the dough tightly and chill for about 2 hours or overnight. 

To roll out the dough: Divide the dough in half and return one half to the refrigerator. Lightly flour a clean work surface, and roll the dough into a long rectangle about 1/8-inch thick. Don't worry if the dough is slightly sticky, simply flour when necessary (a dough scraper comes in handy if part of the dough sticks to your work surface). Using a ravioli cutter, pizza cutter, or sharp knife, trim the dough to be 4-inches wide (reserve the scraps and save them to roll out again). Horizontally cut the dough every 2½ inches. Lightly score a vertical line down the center of the dough using a ravioli cutter or pizza cutter (be careful not to cut all the way through the dough). Use a toothpick or skewer to prick the dough to form two rows of dots on each side of the dividing line. (At this point, feel free to sprinkle the dough with a cinnamon sugar topping- 3 tbsp. sugar to 1 tsp. cinnamon).

Place the crackers on one or two parchment-lined sheet pans. Pre-heat the oven to 350 degrees F. Chill the shaped dough until firm, about 30 to 45 minutes in the refrigerator, or 15 to 20 minutes in the freezer. Repeat with the second batch of dough. Gather any scraps and shape into a ball. Chill until firm, and re-roll.

To bake the crackers: Place the crackers in the pre-heated oven for about 15 to 20 minutes, until browned and slightly firm to the touch (rotate baking sheets halfway through to ensure even baking). Use a spatula to transfer the crackers to drying racks. Let cool completely before placing in well-sealed containers. The crackers will keep well at room temperature for about a week.

Sunday, October 28, 2012

Homemade Marshmallows


I've been wanting to tackle homemade marshmallows for quite some time. For some reason I've never gotten around to it until now. Aaron and I just got back from a delightful getaway in the Adirondacks, near Lake George. Before we left, I had a lot of fun planning cozy camping food: creamy chicken stew with biscuits, fried chicken with mashed butternut squash, and pumpkin pancakes for breakfast just to name a few. Naturally, s'mores were on my list too, so it was the perfect opportunity to tackle marshmallows. Not exactly diet food.


Marshmallows are surprisingly simple to make. I used the same recipe as Deb Perelman over at Smitten Kitchen, from the December 1998 issue of Gourmet. It's straightforward and uncomplicated. My only advice is, if you have kids, maybe make these while they're not around. I had visions of the goopy marshmallow sticking to everything in sight. But don't be discouraged, it's well worth the mess for these little buggers. 


While making this odd confection, I couldn't help but think of how and when they were created. I did a quick wiki search and discovered that the sap from the marshmallow plant was used  to make sweets dating all the way back to ancient Egypt. Of course, the modern incarnation of a marshmallow resembles nothing of it's ancient brother (so you can erase that image from your mind of Tutankhamen roasting marshmallows over a fire). In France, in the early 19th century, the marshmallow sap was whipped and sweetened with sugar, a closer resemblance of what we know today. Later, the use of gelatin and egg whites replaced the marshmallow plant altogether and the rest is history.


For me, confectionery can sometimes be temperamental and challenging, so I was very pleased these marshmallows turned out perfectly on my first try. They are delightfully light and fluffy and are leagues more flavorful than store-bought marshmallows. In a word: yum! You can really taste the vanilla in this homemade version, so be sure to use a good quality vanilla extract.


HOMEMADE MARSHMALLOWS
Recipe from Gourmet, December, 2008

Ingredients:
About 1 cup confectioner's sugar (for dusting the pan and coating the marshmallows)
3 1/2 envelopes (2 tbsp. plus 2 1/2 tsp.) unflavored gelatin 
1 cup cold water, divided 
2 cups granulated sugar
1/2 cup light corn syrup
1/4 tsp. salt
2 large egg whites
1 tsp. vanilla extract

Oil the bottom and sides of a 9 x 13-inch rectangular metal baking pan and dust the entire pan with confectioner's sugar. Set aside.

In a large bowl (or the bowl of an electric mixer) sprinkle the gelatin over 1/2 cup cold water. Let stand to soften.

In a 2 or 3-quart heavy saucepan, cook the granulated sugar, corn syrup, remaining 1/2 cup of water, and salt over low heat, stirring with a wooden spoon, until the sugar is completely dissolved. Increase the heat to medium-low and boil the mixture, without stirring, until a candy or digital thermometer registers 240 degrees (the soft-ball stage), about 12 minutes. Remove pan from heat and pour the sugar mixture over the softened gelatin, stirring until all the gelatin is dissolved. 

Using a standing or handheld electric mixer, beat the mixture on high speed until white, thick, and just about tripled in size (about 6 minutes for a standing mixer and 10 minutes for a handheld mixer). 

In a large bowl with clean beaters, beat the egg whites on high speed until they just hold stiff peaks. Beat the whites and vanilla into the sugar mixture until just combined. Pour the mixture into the prepared pan and smooth out using a rubber spatula. Evenly sift 1/4 cup confectioner's sugar over the surface of the marshmallow. Chill the marshmallow, uncovered, until firm, at least 3 hours or up to a day.

Run a small paring knife around the edges of the pan to loosen the marshmallow. Invert the pan and carefully flip the marshmallow onto a clean cutting board. Using a pizza cutter (or large chef's knife) trim the edges of the marshmallow. Cut marshmallow into 1-inch cubes. Return the cut marshmallows to the pan and sift the remaining confectioner's sugar over the top. Toss the marshmallows to evenly coat in the sugar. Store in an airtight container at room temperature for up to a week.

Yield: about 70 marshmallows 

Notes:

  • Don't be surprised if these brown more quickly over a fire compared to conventional marshmallows. 

Monday, October 22, 2012

Plum & Ginger Jam


There's nothing quite like picking perfectly ripe fruit directly off the tree. Growing up in California, I was lucky enough to have a Santa Rosa plum tree in my backyard. I remember late summer afternoons playing outside and suddenly craving a juicy plum. I'll never forget the explosion of flavor with every bite. One year, our tree produced so much fruit I had to offer bags overflowing with plums to all our neighbors. In retrospect, I wish I had this recipe to put all those plums to good use! 

Years later, our plum tree got sick and my dad had to chop it down. Such a travesty (the worst part is, the stump still remains- a sad reminder of all those delicious plums)! Though the tree may be gone, this jam captures the essence of those incredibly flavorful plums I grew up with. 


For this recipe, I've used a combination of Italian plums and red plums. The red plums gave a beautiful crimson color to the jam. Plums and ginger are a natural combination, but sometimes fresh ginger can overpower a jam, masking the plums delicate flavor. When developing the recipe, I was mindful of this risk, and feel I've struck a nice balance. It's delightfully plummy, with a subtle kick of ginger. A perfect jam at the breakfast table for fall and winter!


PLUM & GINGER JAM

Ingredients:
2 1/2 lbs. (about 6 to 7 cups) unpeeled, pitted, roughly chopped plums (I used a combination of Italian and red plums)
2 to 2 1/2 tsp. freshly grated ginger
1/4 cup water
3 tbsp. lemon juice
3 cups sugar
1/8 tsp. cinnamon
1/8 tsp. allspice

Place 1 or 2 small plates in the freezer for testing the jam later on.

Add all of the ingredients to a large Dutch-oven or stainless steel pot and stir to combine. Mash the fruit slightly and bring to a boil over medium-high heat. Once boiling, attach a candy thermometer to the side of the pot. Adjust the heat as necessary to maintain a constant, even boil, and cook for 15 to 20 minutes or until the jam reaches 220 degrees F. Scrape off any foam that accumulates while boiling (if the jam seems especially foamy, add 1/2 tsp. of butter and stir). 

Begin testing the jam to see that it has set after about 15 minutes (remove the pot from heat and retrieve a plate from the freezer. Place a dollop of jam on the plate and return it to the freezer for a couple of minutes. Run your finger through the jam and if it wrinkles slightly, and does not run back together, it's done. If it's still a bit runny, return the pot to the heat and bring to a boil. Continue checking every couple of minutes in the same manner until done). Taste the jam and if you prefer a little more ginger, grate an additional 1/2 tsp. into the pot and stir to combine. 

Ladle the jam into hot, clean jars, leaving a headspace of 1/4-inch. Remove any air bubbles, wipe rims, and apply lids and rings. Process for 10 minutes in a boiling water-bath canner (for 4 oz. jelly jars or 8 oz. half pint jars). Turn off heat, remove lid, and let jars sit in canner for 3 to 5 minutes before removing. Allow jars to rest on a dishtowel undisturbed for 6 to 8 hours or overnight. Check seals, label, and store in a cool dark place for up to a year. If any jars did not seal properly, place them in the fridge and use first. For more information, see my step-by-step guide to canning here.

Yield: 4 cups

Wednesday, October 17, 2012

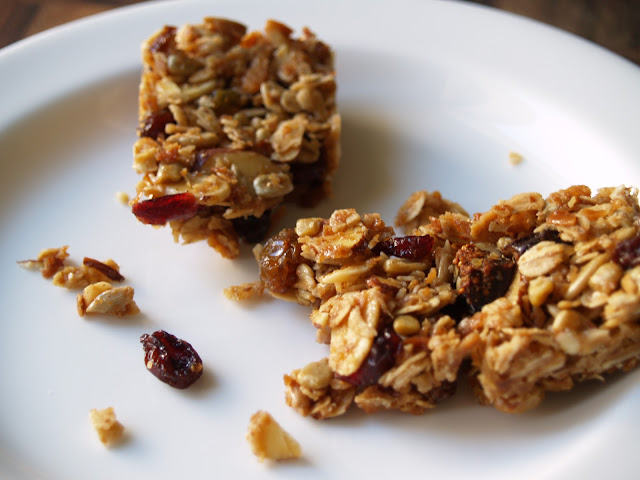
Homemade Granola Bars


The wonderful thing about homemade granola bars is that you know exactly what's in them. There are so many granola bars on the market filled with ingredients I've never heard of, not to mention preservatives. That doesn't sound too enticing or healthy. The homemade version I've made, adapted from Ina Garten, is firm, yet chewy. The great part is, they last for a month in the freezer and defrost in just a few minutes. I like to take them on the road with me or when running errands. It's easy to work up and appetite when scurrying around the city and it's great to be able to pull out a couple homemade granola bars to tide me over. I sound like a mom. 


Later this week, Aaron and I are heading off on a mini vacation to the Adirondacks in beautiful upstate New York. Both of us has never been that far upstate, so hopefully we'll have some relaxing quiet time away from NYC and  get to see some spectacular fall foliage. We plan on hiking for some of the time (our dog, Lady, won't know what hit her...no sleeping around the apartment like a bum), so these granola bars will definitely come in handy. A must have on any camping or outdoor excursion!


Like granola, granola bars are extremely versatile, allowing the cook to incorporate whichever dried fruit or nuts they desire. There's room for imagination, so play around with the recipe to see what you like best.


HOMEMADE GRANOLA BARS
Recipe adapted from Ina Garten, Back to Basics, 2008

Ingredients:
2 cups old-fashioned rolled oats
1 cup sliced almonds
1/2 cup toasted sunflower seeds
1/2 cup toasted wheat germ
3/4 tsp cinnamon
3 tbsp unsalted butter
2/3 cup honey
1/4 cup light brown sugar, lightly packed
1 1/2 tsp pure vanilla extract
1/4 tsp kosher salt
1/2 cup chopped, stemmed dried figs
1/2 cup dried cranberries
1/2 cup raisins 

Preheat the oven to 350 degrees F. Butter an 9 x 13-inch baking dish or pan and line with parchment. Butter the parchment and set aside.

Toss the oats, almonds, and coconut together on a sheet pan and bake for 10 to 12 minutes, stirring every so often, until lightly browned. Transfer the mixture to a large mixing bowl and stir in the wheat germ, sunflower seeds, and cinnamon. Reduce oven temperature to 300 degrees F.

Combine the butter, honey, brown sugar, vanilla extract, and salt in a small saucepan, and bring to a boil over medium heat. Cook and stir the mixture for 1 minute, then evenly pour over the toasted oat mixture. Add the dried figs, cranberries, and raisins and stir well to combine. 

Pour the mixture out into the prepared pan. Using a metal spatula, firmly press the granola mixture into the pan, seeing that it is evenly distributed. Bake for 25 to 30 minutes, or until lightly golden brown. Cool in the pan for 2 to 3 hours before transferring to a cutting board. Cut the granola into 16 bars. The bars keep well at room temperature for a few days. For long term storage, place bars in a gallon zip-top bag and freeze for up to a month.

Yield: 16 granola bars

Thursday, October 11, 2012

Pumpkin Beer Mustard


The other day a friend and chef (who's tried my homemade Guinness mustard before) suggested I try using other beers as a base, such as pumpkin. I thought that was a great idea and seasonal too! Pumpkin beers are such a wonderful fall treat. In fact, it doesn't quite feel like fall until I've had a sip of an autumnal inspired sud. Before you know it, pumpkin beers are gone, so by incorporating it into mustard, it's a wonderful way to preserve that hoppy pumpkin flavor for months to come. 


Pumpkin mustard is a natural condiment for all those delicious Bavarian sausages and pretzels which wouldn't be complete without an Oktoberfest or pumpkin beer. This mustard might be cause enough for an Oktoberfest type celebration! 


I've used roughly the same recipe as the Guinness mustard, I've just increased the spices a bit and used apple cider vinegar instead of red wine vinegar. I think it pairs nicely with the pumpkin beer. The choice of beer doesn't really matter, so pick your favorite pumpkin brew, although I would suggest using a slightly darker beer versus a lighter one. This will give the mustard a more complex flavor and darken it's overall color. I've used yellow mustard seeds because I'm privy to spicy mustards, but feel free to use black or brown mustard seeds if you prefer a milder mustard. 


PUMPKIN BEER MUSTARD
Adapted from Saveur, Issue 117

Ingredients:
7 oz. pumpkin beer (plus 1 to 2 oz. for thinning out mustard later on)
1 cup mustard seeds (see notes below)
1/2 cup apple cider vinegar
1/2 tbsp. kosher salt
1/2 tsp. freshly ground black pepper
1/4 tsp. ground cinnamon
1/4 tsp. ground cloves
1/4 tsp. ground nutmeg
1/4 tsp. ground allspice

Combine all of the ingredients in a medium size non-reactive bowl. Cover with a sheet of plastic wrap and let sit at room temperature for 1 to 2 days to allow the mustard seeds to soften and the flavors to meld. 

Transfer the mixture to the bowl of a food processor and process, stopping every so often to scrape down the sides of the bowl with a rubber spatula (process until the seeds are coarsely ground and the mustard begins to thicken, about 1 to 2 minutes). If the mustard seems too thick, add 1 to 2 tablespoons more of pumpkin beer, and stir to combine. Transfer the mustard to a large glass jar with a tight fitting lid. Refrigerate overnight to use immediately, or refrigerate and use within 6 months.

Yield: about 2 1/4 cups 

Notes:
  • If you prefer a spicy mustard, use yellow mustard seeds. For a milder mustard, use brown or black mustard seeds. It's significantly cheaper to buy mustard seeds in larger packages at specialty spice stores, such as Kalustyan's in NYC (123 Lexington Ave.).
  • As expected, the potency of the mustard will mellow a bit as it ages. 

Sunday, October 7, 2012

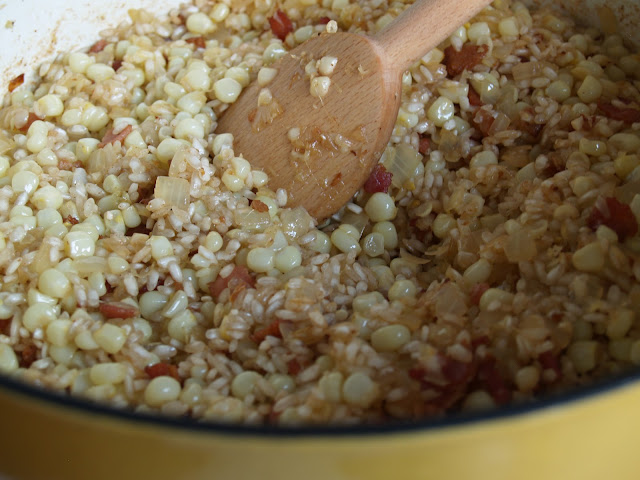
Corn & Bacon Risotto


This is one of my favorite risottos to make in summer and early fall. This recipe originally came from chef and cookbook author, Sara Jenkins and was featured in Edible Manhattan's first issue in the fall of 2008. I've been making a version of it ever since. I love how this dish adapts traditional Italian cooking and makes it completely American using ingredients that are local to us in the states. As Sara Jenkin's says in Edible Manhattan, "You wouldn't ever eat this in Italy, but it's true to the spirit." 


Risotto takes well to so many ingredients, making it a great vessel for the abundance of summer and fall vegetables. In fact, one of my favorite things is to go to the farmer's market, pick out what looks best and create an impromptu risotto. I did just that with my family last month while winding through the Santa Cruz farmer's market in California. It seemed everything was jumping out at me! Vibrant piles of squash and peppers, enormous bunches of basil with dirt still clinging to their roots; you never know what you'll find! Nothing is more fun or satisfying than to cook a dinner where the ingredients are a celebration of the best produce you found that day. 

Early autumn is an exciting time at the market because the summer and fall vegetables overlap for a week or two. Those big colorful peaches and tomatoes begin to disappear just as crisp apples and winter squash pop up. 


I always think of this risotto as a base to add on to. I particularly love stirring kale or swiss chard into the creamy corn just when the rice has finished cooking. Sometimes when you find really fresh and sweet corn (where the kernels look so plump they could burst) you don't need to add anything; just let the corn do its thing. Happy fall!


CORN & BACON RISOTTO

Slightly adapted from Sara Jenkins, Edible Manhattan, September/October 2008

Ingredients:
2 tbsp. olive oil
2 tbsp. unsalted butter, divided
4 to 6 slices thick bacon, cut into ¼-inch pieces
1 medium yellow onion
2 cloves garlic, minced
4 to 6 ears fresh corn, kernels sliced off and cobs reserved 
2 cups Arborio or Carnaroli rice 
1 cup dry white wine
5 to 6 cups chicken or vegetable stock, preferably homemade
1½ cups grated Parmigiano-Reggiano or Grana Padano
Salt and pepper to taste

In a 4-quart saucepan, heat the stock to a simmer with the reserved corncobs.

Meanwhile, in a large Dutch-oven or stainless steel pot, heat oil and 1 tbsp. butter over medium-high heat. Add bacon and cook, stirring constantly, until bacon begins to crisp, about 2 to 3 minutes.

Add onions and a pinch of salt and cook, stirring, until onions are translucent, 6 to 8 minutes. Add the garlic, stir, and cook for 1 minute more. Stir in the corn and cook until it begins to brown slightly (if cooking too quickly, adjust heat to keep from burning). Add the rice and cook for 5 minutes, stirring constantly. Pour in the wine, stir, and allow to be absorbed by the rice, about a minute. Add 1 cup of stock to the rice, stirring constantly, until just absorbed, about 2 to 3 minutes. 

Add 1 ladle full of stock (about ½ cup) to the rice and stir until almost absorbed. Continue adding 1 ladle full of stock at a time, allowing to absorb each time before adding more, stirring constantly. Continue in the same manner until all of the stock is used up. The risotto should be tender but slightly firm (here is where you can stir in some greens if you'd like). Remove pot from heat and stir in the cheese and remaining 1 tbsp. butter. Season to taste with salt and pepper and cover. Let rest for 5 minutes. Serve immediately with freshly ground pepper and a sprinkling of Parmigiano cheese.

Notes:

  • Feel free to substitute the bacon with Italian pancetta.