Saturday, May 31, 2014

Mussels on the Half Shell, Gratinéed


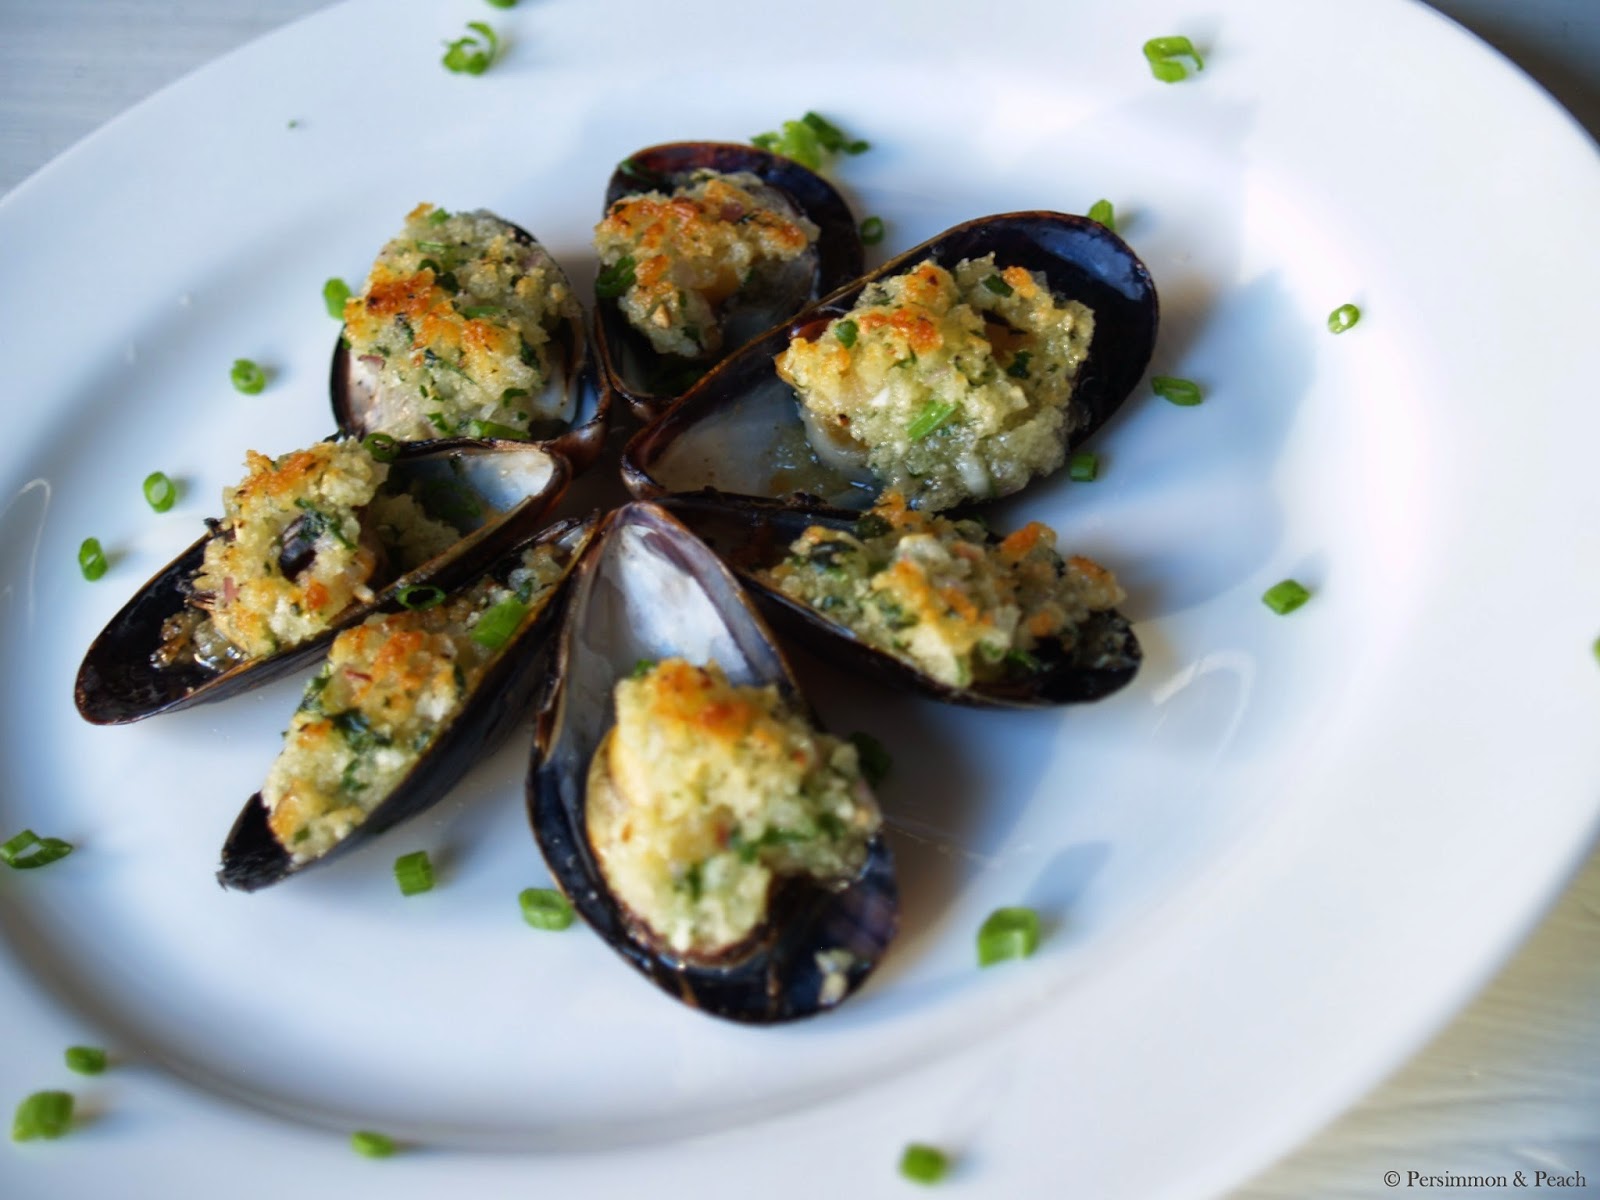
I came across this recipe for mussels gratinéed, or moules à la provençale, in Julia Child's classic, Mastering the Art of French Cooking. I'd tagged the page a while back and saw it the other day when Aaron and I were in the mood for mussels.  It's a nice alternative to steamed mussels; the buttery breadcrumb topping provides a contrasting texture and a satisfying crunch. 


This is a great way to prepare mussels if you're serving a crowd, or even over pasta for a dinner of four. It's host-friendly in that you can steam the mussels, cover them with the breadcrumb topping, and refrigerate until your guests arrive. Simply place them under the broiler for 5 minutes and they're ready to be served.


Aaron and I had these for lunch last week and devoured them like vultures; I'm glad there was no one else around to witness our glutinous downfall. I swear there are few things better on earth than mussels dripping with butter, shallots, fresh herbs, and crispy breadcrumbs, especially when paired with a cool glass of dry white wine.


MUSSELS ON THE HALF SHELL, GRATINÉED

Yield: About 94 mussels

Ingredients:
For the Breadcrumb  Topping
2 sticks (1/2 pound) unsalted butter, at room temperature 
3 garlic cloves, minced
2 medium shallots, minced
1/4 cup chopped fresh parsley
1 cup panko breadcrumbs
Salt and freshly ground black pepper, to taste

For the Mussels
2 pounds mussels, scrubbed 
1 tablespoon kosher salt
2 cups dry white wine
1 bay leaf
2 to 3 sprigs fresh flat-leaf parsley
2 tablespoons chopped chives, for garnish


For the Breadcrumb Topping
Using a wooden spoon, beat the butter in a medium bowl until it is light and creamy. Beat in the garlic, shallot, parsley, and breadcrumbs. Season to taste with salt and pepper. Cover with a sheet of plastic wrap and refrigerate until ready to use (alternatively, spoon the topping mixture into a pastry bag fitted with a 1/2-inch piping tip or a plastic zip-top bag cut with a 1/2-inch opening).

For the Mussels
Sort through the mussels and discard any that are not firmly closed. Using a paring knife, scrape off the "beard", if any,  along the seam of the mussels. Place the mussels in a large bowl and sprinkle with the salt. Add enough cold water to cover, and allow the mussels to soak for 20 minutes. Drain the mussels. If any sand remains at the bottom of the bowl, soak them again. Repeat until no more sand remains.

Combine the wine, bay leaf, and parsley sprigs in a large pot. Bring the wine to a boil for 2 minutes. Add the cleaned, drained mussels, cover the pot and give it a good shake. Let the mussels cook for 3 minutes, or until they just begin to open. Remove the pot from the heat and allow the mussels to cool slightly.

Preheat the broiler. Discard the empty shell halves and arrange the mussels on an aluminum foil-lined sheet pan. Pipe or spoon 1 teaspoon of the topping mixture onto each of the mussel halves. Place the mussels under the broiler for about 5 minutes, or until the butter has melted and the bread crumbs are lightly browned. Sprinkle the mussels with the chives and serve immediately.


Sunday, March 30, 2014

Preserved Meyer Lemons


Preserved lemons, most often associated with Middle Eastern and North African cuisine, make a flavorful addition to many dishes. In fact, preserved lemons appear in several cuisines, the world over. In Morocco, preserved lemons are traditionally incorporated into tagines or stews, fish dishes, and couscous. The unique tart and salty lemons add a great depth of favor to many American dishes as well, particularly throughout the spring and summer.


If seeing the word "preserved" sends a shiver down your spine, never fear! In fact, you need no previous knowledge of preserving or canning to master this recipe. Essentially, the lemons are preserved packed in salt, making this recipe so simple, a child could do it! There's no fretting over whether the jar sealed properly or not etc.

You may be asking, "why preserve lemons at all?" That's not a bad question, seeing as lemons are in abundance all year long; preserving them seems unnecessary. For me, it's nice to know you always have them on hand. In addition, the preserving process makes the lemon rinds entirely soft and edible, as well as intensely lemony.  Since Meyer lemon rinds are softer than the conventional variety to begin with, they're an ideal choice for preserving. Also, it's a great way to enjoy Meyer lemons all year long, as they have a relatively short season.  


I've kept the seasonings in my version pretty basic to accommodate a variety of dishes. But feel free to add other spices to the lemons, such as mustard seed, cinnamon, and cloves. Preserved lemons are particularly tasty finely diced and added to salad, dressings, salsa, ceviche, and even gremolata. Quite simply, they can be incorporated in anything where fresh ones are, so the possibilities are endless!


PRESERVED MEYER LEMONS
Adapted from The River Cottage Preserves Handbook, by Pam Corbin and Tart and Sweet, by Kelley Geary and Jessie Knadler 

Yield: 2 pint jars or 1 quart jar

Ingredients:
10 to 12 Meyer lemons
Kosher or sea salt, as needed
1 teaspoon whole black peppercorns
2 bay leaves

Sterilize 2 pint canning jars or 1 quart canning jar (submerge them by 1 inch in a large pot of boiling water for 10 minutes). Put 1 tablespoon salt, 1/2 teaspoon peppercorns, and 1 bay leaf into the bottom of each jar (or 2 tablespoons salt, 1 teaspoons peppercorns and 2 bay leaves is using a 1 quart jar).

Juice two of the lemons and set aside. Cut 1/4 inch from both ends of the remaining lemons. Cut a deep X in the lemons lengthwise, being careful not to trim all the way through (leave about 1/2 inch uncut so they're still attached on one end). The lemons should resemble a four-petal tulip. Pack each lemon opening with as much salt as possible (don't worry, you can't overdo it). 

Tightly pack the lemons into the jar(s), squishing them down with a wooden spoon to release their juices. Top the lemons with enough lemon juice to cover, leaving a head-space of 1/2 inch. Wipe the rims with a clean damp cloth and secure the lids.

Leave the jar(s) to sit out at room temperature for about a month. Continue pushing down the lemons with a wooden spoon every few days, adding fresh lemon juice to cover as needed. After a month, when the lemon rinds have softened, transfer the jars to the refrigerator, where they will keep for up to a year. 


Notes:

  • If the lemons seem especially waxy, blanch them in a pot of boiling water for 30 seconds to remove their wax. Wipe them dry with a clean cloth before proceeding with the recipe. 
  • Give the preserved lemons a quick rinse to remove the excess salt before adding them to your favorite dishes.


Sunday, January 26, 2014

Creole Jambalaya


I thought jambalaya would be the perfect comfort food to make last week on a snowy winter's night. In fact, it's an ideal meal to make throughout the winter months; it's a filling one pot meal that really sticks to your bones. For inspiration and guidance I referred to Howard Mitcham's Creole Gumbo and All that Jazz and Paul Prudhomme's Louisiana Kitchen, two holy grails when it comes to Louisiana cooking.


According to Mitcham's Creole Gumbo, and John D. Folse's The Encyclopedia of Cajun and Creole Cuisine, the now famous Creole-Cajun stew is a close cousin to Spanish paella. In the early 18th century, Spanish settlers brought paella to New Orleans, but since traditional Spanish ingredients for the dish- such as clams, mussels and saffron- were not available, the recipe was adapted using indigenous ingredients. Oysters and crawfish replaced clams and mussels, and saffron, an expensive and difficult commodity to come by in the New World, was often substituted with tomatoes. Jambalaya was also influenced by Africans living in Louisiana, who called their rice 'yaya.' The French later named the dish 'Jambon a la Yaya' (meaning ham with rice), which was later shortened to simply, 'jambalaya'. 


Though many variations and methods of the dish exist, jambalaya was traditionally made by adding rice to leftovers or other odds and ends that happened to be lying around the kitchen in order to stretch them as long as possible. Many poor Cajun families likely ate jambalaya several times a week out of necessity, particularly during the Depression. Later, it was popularized outside of Louisiana by the hit Hank William's song, Jambalaya and has since become a celebrated classic. Though the list of ingredients looks long, making this dish as it is intended- using leftover chicken and a few stray slices of deli ham etc.- cut down on its intimidation factor and make it more practical. For more Louisiana dishes see here.


CREOLE JAMBALAYA
Adapted from Creole Gumbo and All That Jazz, by Howard Mitcham and Chef Paul Prudhomme's Louisiana Kitchen, by Paul Prudhomme

Serves 8 to 10

Ingredients:
2 (16 ounce) cans beef broth, plus more as needed
4 tablespoons (1/2 stick) unsalted butter
1 pound Andouille sausage, cut into 1/2-inch rings (see notes below)
1/2 pound smoked ham, diced
4 tablespoons flour
2 medium white onions, finely chopped
2 to 3 large scallions (white and green parts), chopped
1 cup finely chopped green bell pepper
1 cup finely chopped celery
4 garlic cloves, minced
1 (28 ounce) can whole plum tomatoes, drained and chopped
1 bay leaf
1/2 teaspoon dried or fresh thyme
1/8 teaspoon ground cumin
1/8 teaspoon ground cloves
1/8 teaspoon ground allspice
1/8 to 1/4 teaspoon cayenne pepper 
1/2 pound cooked chicken, diced
2 pounds shrimp, peeled (reserve the shells for another use, such as seafood stock)
2 cups long grain white rice
Salt and freshly ground black pepper, to taste


Bring the beef broth to a boil in a small saucepan. Cover, remove from heat, and set aside. 

Melt the butter in a large pot or Dutch oven over medium heat. Add the sausage and ham and cook, stirring occasionally, until they are lightly browned. Stir in the flour. Add the onions, scallions, green pepper, celery, and a pinch of salt, and cook until the vegetables are soft and almost translucent, about 8 minutes. Add the garlic and cook for 1 minute more.

Stir in the chopped tomatoes along with any juices that have accumulated on the cutting board. Add the bay leaf and stir in the thyme, cumin, cloves, allspice, and cayenne. Add the hot beef broth to the pot and stir to incorporate. Add the shrimp and chicken. Stir in the rice and season to taste with salt and pepper. There should be enough liquid in the pot to just cover the ingredients. Add more broth or water, as necessary.

Bring the liquid to a boil, then reduce the heat to low and cover. Cook the rice at a low simmer, occasionally stirring and scraping the bottom of the pot until done, 30 to 35 minutes. Jambalaya should be moist, but not soupy. Taste to adjust seasonings and serve with a cold beer or glass of full-bodied red wine. 

Notes:
  • If you can't find Andouille sausage at your local butcher or market, substitute it with another smoked pork sausage, such as kielbasa. 

Saturday, January 18, 2014

Carbonnades à la Flamande


Carbonnades à la flamande, or simply, carbonnade, is a classic Belgian stew made from beef and onions braised in beer. It is a close cousin to the red wine-based French boeuf bourguignon minus the carrots and mushrooms, though you could certainly add them if you wanted to break with tradition. The stew is traditionally flavored with a little brown sugar and a splash of apple cider vinegar or mustard, which further compliment its unique sweet and sour flavor.


I first made this dish when I spotted it flipping through Julia Child's 'Mastering the Art of French Cooking' a number of years ago. It's a great winter dish, especially when there's a polar vortex upon us! I find it's a nice break from the more common red wine-based stews and braises that are typical throughout the season. Traditionally, the type of beer used most likely depended on the region in which the dish was cooked. Keeping that in mind, I've never been too obsessive over which beer to use. Over the years I've used different varieties, but I most commonly use a dark Belgian-style ale. Try a few types of Belgian beers and see what you prefer (don't judge, but I've even used Miller Highlife in a pinch, and though it wasn't as rich or dark as an Abbey-style beer, it still tasted great. However, a darker, slightly bitter-sour tasting beer is ideal). 


As with most braises, low and slow is key. I made this stew first thing in the morning and reheated it for dinner later in the day. It tastes even better a day or two after cooking, making it a great guest-friendly meal to be prepared in advance. Serve carbonnade with some crusty bread, potatoes or buttered noodles, and of course, a Belgian-style beer (or a full bodied red, if you prefer)!


CARBONNADES À LA FLAMANDE 
Adapted from Mastering the Art of French Cooking, Child, Bertholle, Beck  

Serves 6

Ingredients:
2 to 3 cups beef broth
2 tablespoons olive oil or vegetable oil, plus more as needed
4 slices (about 4 ounces) thick-cut bacon, diced
3 pounds chuck roast, cut into 2-inch by 4-inch slices, about 1/2-inch thick
Salt and freshly ground black pepper, as needed
All-purpose four, as needed
1 1/2 pounds yellow onions (about 5 medium), sliced 1/4-inch thick
4 garlic cloves, minced
1 pint (2 cups) dark Abbey-style Belgian beer
2 tablespoons brown sugar
3 sprigs flat leaf parsley
4 sprigs thyme
1 bay leaf
2 tablespoon unsalted butter, at room temperature
3 tablespoons all-purpose flour 
2 tablespoons apple cider vinegar (or red wine vinegar)
1 tablespoon chopped flat leaf parsley, for garnish


Preheat the oven to 275°F. 

Bring the beef broth to a simmer in a small saucepan, shut off the heat, and cover the pot to keep warm. Set aside.

In a large Dutch oven or pot, heat 1 tablespoon olive oil or vegetable oil over medium heat. Add the bacon, stirring occasionally, until it has begun to brown. Use a slotted spoon to transfer the bacon to a large plate or casserole dish. Set aside. 

Thoroughly dry the cut beef with paper towels (to ensure good browning) and generously season with salt and pepper. In a large bowl, toss the beef with just enough flour to lightly coat. Add another tablespoon of olive oil or vegetable oil to the pot. Quickly saute the beef in small batches over medium heat until it is nicely browned on both sides. Transfer the meat to the plate or casserole dish with the bacon. Continue sauteing in the same manner until all the beef is browned, adding more olive oil or vegetable oil as necessary. Set aside.

Add the onions to the pot and saute over medium heat, stirring occasionally, until they are  caramelized, 20 to 25 minutes. Add the garlic and cook for a minute more. 

Pour in half of the beer and using a wooden spoon, scrape up the brown bits on the bottom of the pan. Bring the beer to a simmer and allow it to reduce, about 4 minutes. Return the beef and bacon back to the pot along with any juices that have accumulated. Stir in the brown sugar. Pour in the remaining beer and enough warmed beef stock to almost cover the meat. To make the bouquet garni (herb bundle), tie the parsley, thyme, and bay leaf together using butcher's twine (for ease in removing later) and add to the pot. Bring to a simmer, cover the pot with a tight fitting lid, and place it in the oven for 1 1/4 to 1 1/2 hours, or until the meat is very tender when pierced with a fork. 

When the stew is done, transfer it to the stovetop. Use a spoon to skim off any fat that has risen to the surface and discard. Make a beurre manie (a thickening agent of butter and flour): combine the butter and flour in a small bowl and blend until smooth using a fork. Stir the beurre manie and vinegar into the stew and bring it to a boil. Reduce the heat and let it simmer uncovered for 10 minutes. Remove the bouquet garni and discard. Season to taste with salt and pepper and serve. Garnish each plate with chopped parsley. Serve carbonnade with some crusty bread, potatoes or buttered egg noodles, and of course, a Belgian-style beer (or a full bodied red, if you prefer).

Alternatively, let the stew cool, cover, and refrigerate. To reheat, bring to a simmer on the stovetop, stirring occasionally. Cover the pot, reduce heat slightly, and simmer gently for about 10 minutes prior to serving.